WooCommerce not sending emails
How to fix WooCommerce not sending emails notifications
Updated date: 4th June, 2021
Updated on 4th June 2021 We have been hearing that a lot of people having the same problem that WooCommerce emails not working.
I had been personally using WooCommerce to build my shopping cart system on my first website here at Sprout-Flowers. I had the same issue too – WooCommerce emails not sending.
It has come to my attention that a lot of people are having the same problem I was having which was, WooCommerce email notification not working.
Before we jump on it, if you want to fix this woocommerce email issue along with website speed optimization and website security, I would highly recommend you to hire a virtual assistant from a reputed company like WoodBows (this is not an affiliated link). They will maintain your entire website and businesses. I can’t explain how peaceful I have become after handing my business over to my virtual assistant.
Let me walk you through what I learned or followed to fix the Woocommerce email notifications problem.
If you are a video guy, you can check out this video tutorial here:
Fix. 1 for WooCommerce not sending emails issue: Look for commas or periods in Email sender settings
Step 1. Drill down to New Order Email settings
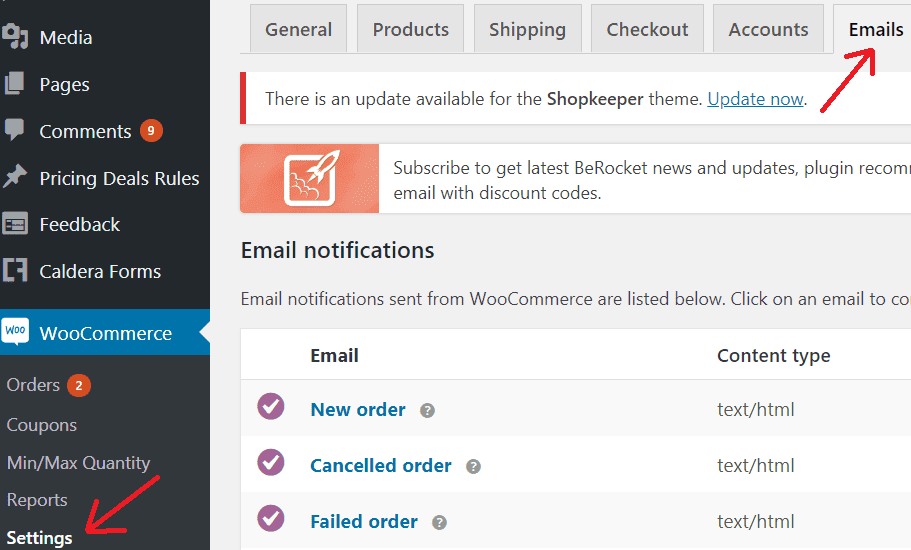
First of all, let’s go to my WooCommerce plugin –> settings. You can also the images here for step by step walk-through.
Now in the settings, let’s go ahead and choose emails. Now you will see a table of email.
To customize the New Order email settings, head over to New Order and click on the title or you can also click the gear icon at the right end of each field.
Either method should work though.
Step 2. Check the WooCommerce Email sender options settings
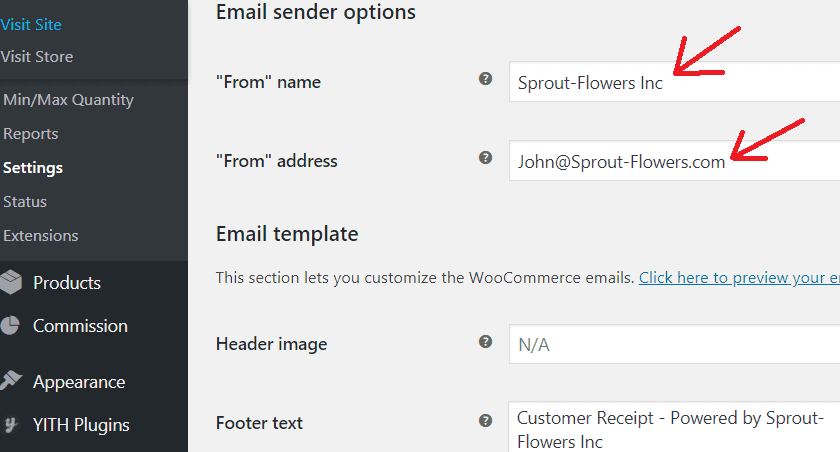
Before I do anything, I want to make sure I typed in my From name field probably my company name and my company email id in From address field.
I already had this all set up as shown in the image here.
However, you can, of course, put your From address and make sure the From address is set to your name or whatever your email address is.
Also, you want to check the domain here in From email address and see if it matches with your company name. It is recommended by WooCommerce. I don’t really think it is required.
Step 3. Look out for commas or periods and delete them
Fix 1: You may want to make sure there is no commas or periods in any of these From name or From address fields. If you had, WooCommerce email notifications will not work.
I hope that’s the problem you have. Because in most cases, that would be the problem.
If it looks fine and dandy, continue and head on to the next section here.
Fix 2. Have an SMTP to send email from WooCommerce
Why are WooCommerce emails not sending?
With that setting out of the way, another thing you want to do here is, route your emails through SendGrid.
Because one of the frustrating things about the WooCommerce email is they don’t actually let you configure your SMTP configuration in it.
That’s because it uses the built-in WordPress mail function to send emails, which means it should just work, right?
But the truth is, it doesn’t always just work which is the main reason for this WooCommerce not sending emails issue.
So, we need an external SMTP to send our emails. If you don’t understand this point, don’t worry, you can just follow these simple steps outlined here.
Step 1. Sign up for a free account in SendGrid
However, if you don’t know what SendGrid is, in short, it just lets you send emails.
You can sign up for free SendGrid account at https://sendgrid.com/.
As I mentioned, it is a free account so you don’t have to pay anything at this stage. Using SendGrid you can send up to 200 emails a week for free.
Why SendGrid?
Before I jump into it, I just want to make one thing clear: I am not affiliated to SendGrid. If you think, you have found a better option than SendGrid, please feel free to use it.
There are a couple of reasons, I recommend using this. Without SMTP or SendGrid, you would send emails out from your server, that is, your local server. This is default with WordPress.
And for some reason, if you are on shared hosting, like most of us including me, there is a good chance that your server gets blocked because somebody else on your server might be spamming.
Since it is a shared hosting, all of your emails will get sent as spam as well thanks to the other guy’s spamming activity assuming you fixed WooCommerce not sending emails issue some other way.
However, if you use this method, SendGrid will alleviate that problem by sending or rotating servers. Also, they would keep monitoring their servers to make sure it doesn’t get blocked, in other words, tagged as spam.
And a great thing is if you are a small business owner, your emails would be of a low volume.
The best part is you can use SendGrid for free sending up to 200 emails a week. You might want to check their website for up to date information on the free email count though.
Step 2. Install WP SendGrid SMTP plugin
Now let’s look at how to set up SendGrid on your WordPress site. As usual,
Go to plugins –> Add new. In the search area, type in SendGrid. Choose the SendGrid plugin by SendGrid. Install and activate it.

Here is the deal: If you are not a big fan of adding an additional plugin, you can also get away fixing the WooCommerce not sending emails issue without this plugin. However, using this plugin would your life simpler.
Step 3: Set up WP SendGrid SMTP settings
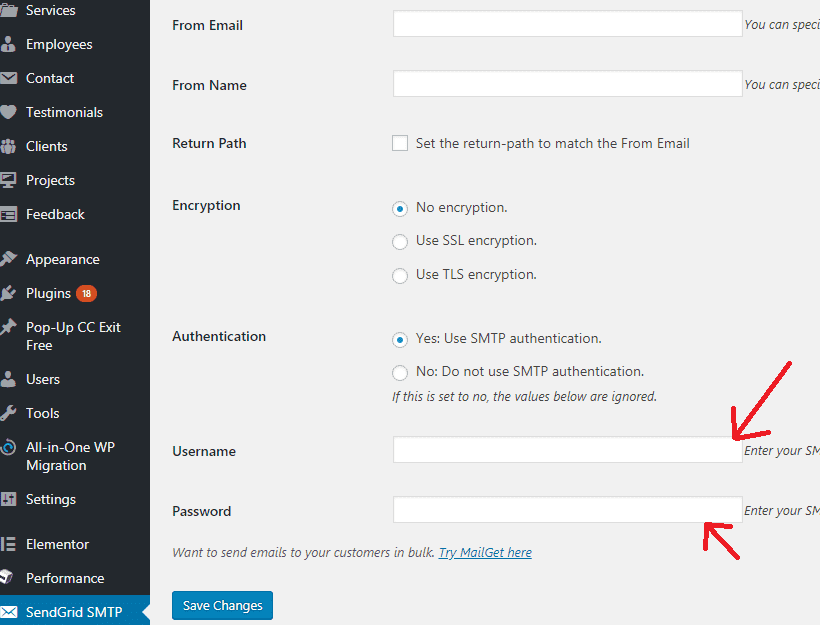
After you installed, go to SendGrid SMTP settings.
SendGrid has a whole registration process. After you are done with the SendGrid registration, enter the SendGrid username and password in the above plugin settings.
If you want to, you can try to get it to work with SSL by clicking the checkbox next to Use SSL encryption.
But if you want to use SSL encryption you have to use the SSL extension for PHP, this is something you have to do if you checked this option. However, whether you select SSL or not, it should fix WooCommerce not sending emails problem.
Also, you have to fill in my From Email and From name as my company email address and name accordingly.
After you have completed all the settings, you can test it. A good way to test is, you can just create a dummy order and see if you receive the confirmation email.
Fix 3. Enable email notifications in WooCommerce email settings
However, before doing that, I would go to my email settings again and make sure that my emails are enabled for each of these sections here:
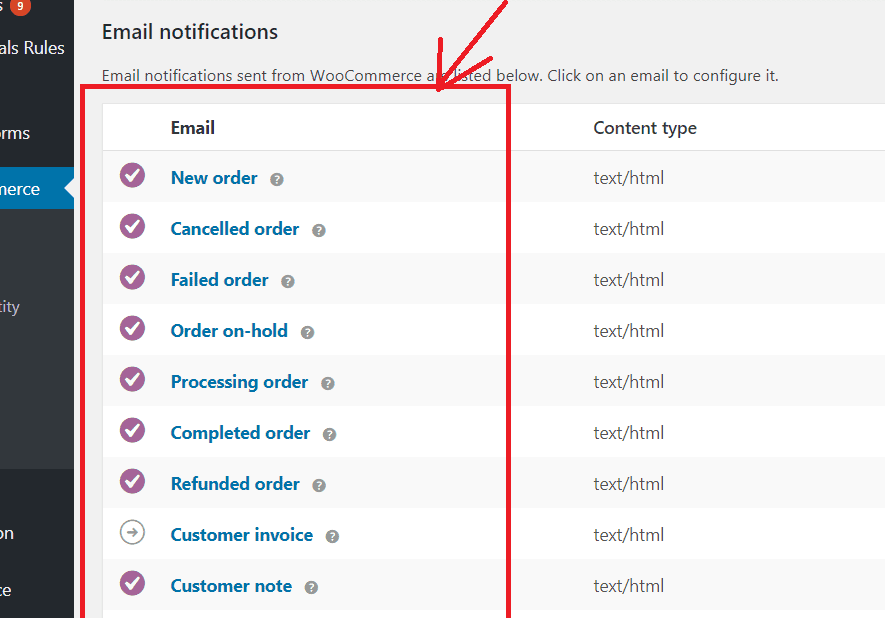
To check if the email notifications are enabled, go to:
New order –> Configure. To go to configure, you want to click the gear icon on the right side.

In this window, check the Enable this email notification checkbox. Please remember if it is not checked, WooCommerce will not send out emails for new order when they place it.
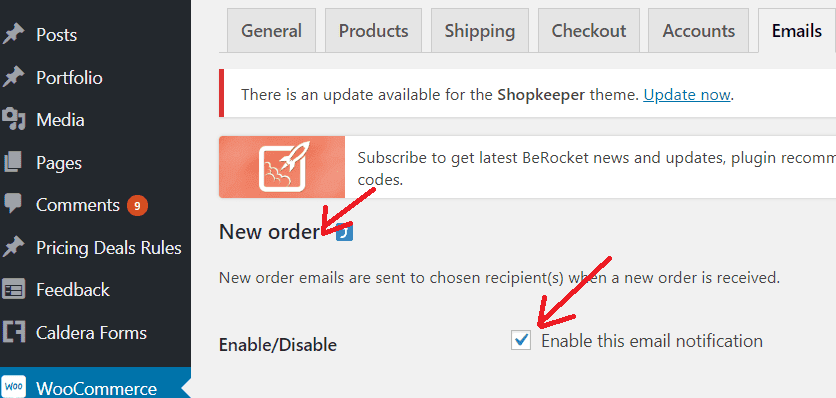
You may want to repeat the same process for Cancelled order, Failed order and so on. Each one of these sections has its own settings. After enabling this you might want to do a quick test if it fixed the WooCommerce not sending emails issue.
Step 4. Create a test order to see if you get email notifications:
Finally, we are done with all the settings. We are now good to go for the test. Let’s go ahead and create a dummy order.
I would go to my product and add a product to the cart and proceed to checkout.
After I fill up company address information in there and place an order now, of course, there is no actual credit-card processing since this is just a simulated order.
To check if the above order went through, I would go back to WooCommerce –> orders. It will have created an order as shown here.
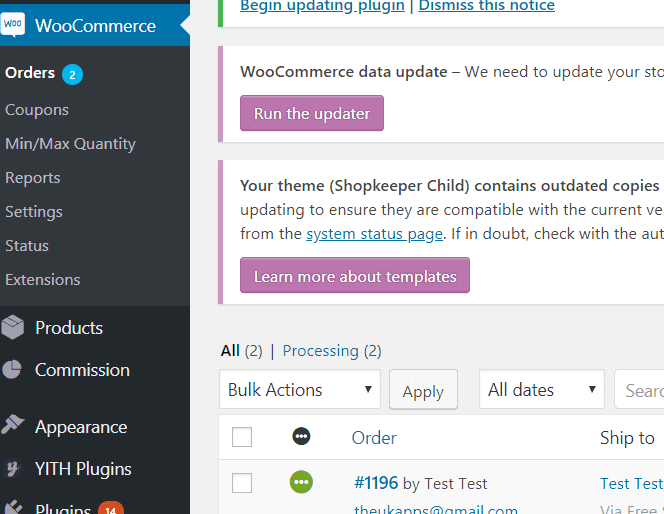
And at this point, the customer should have been emailed. Let me pull up my email on another page so I can check if I received it and hopefully I did because otherwise, this will be an embarrassing tutorial.
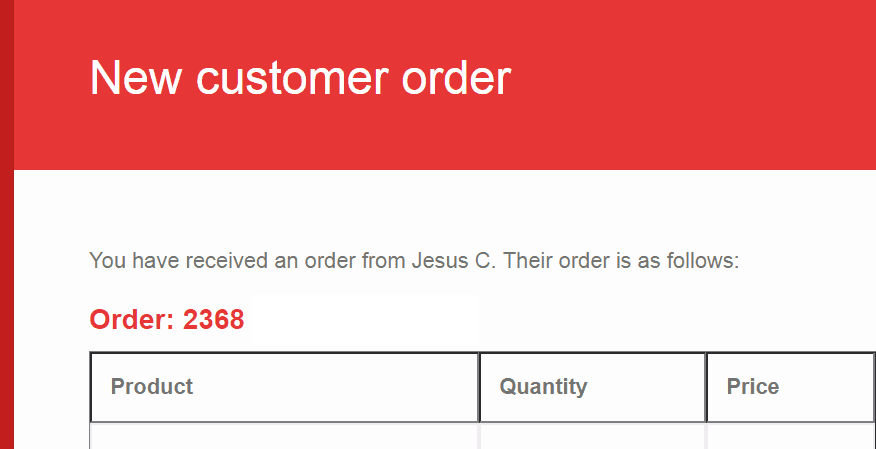
Whoola, as you can see I have deleted some of the information above for security purposes. I received a new order confirmation email from WooCommerce. The email finally came through.
I placed an order before I set up SendGrid and WooCommerce emails not working then.
However, after I set up SendGrid, this WooCommerce not sending emails problem has been completely fixed.
I understand WooCommerce emails not sending issue might be a frustrating one. Hope it has fixed your WooCommerce email notifications problem.
Further email customizations (optional):
Why does this matter? Needless to say, you would probably not want your customers to receive such unformatted email from you.
Let me quickly show how to customize your email settings. And remember these steps are optional.
The above steps are enough to fix WooCommerce not sending emails notification issue. However, if you do want to customize the look of your emails, you can follow these remaining steps too.
Step 1. Setting the From name and From email address
Click on WooCommerce –> Settings then click the Emails tab.
In the beginning, you will be greeted with a table of the emails WooCommerce would send, we will come back to these shortly. We first need to cover the general email settings.
Further down kicking things off with the email sender options section, you can set the From name and From address. These are important to set as it is what your customers see in their inbox.
For example, with these settings, it would show that they have received an email from Sprout-Flowers from John@sprout-flowers.com email address.
For the screenshots, please refer the section 3 above. And please remember, having a comma or period might trigger the WooCommerce emails not sending bug again.
Step 2. Customizing the look of the emails
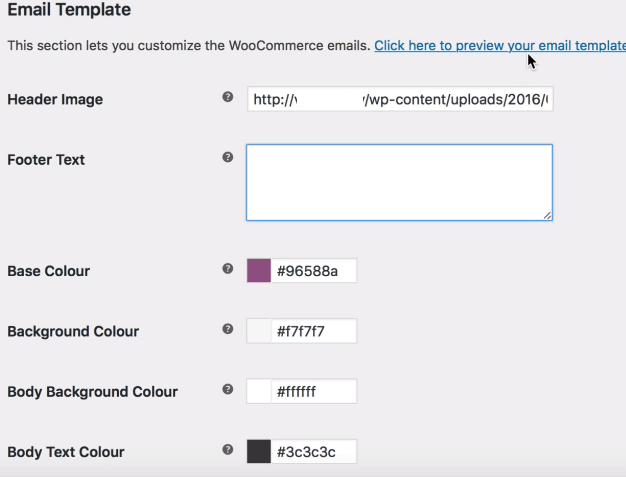
Next, under email template, you can customize the look of your emails. You can enter an image URL for a Header Image.
I would recommend uploading one under Media –> Add New, then copy the image URL and paste it in the Header Image field.
You can also customize the text in the Footer Text field that appears at the bottom of every email sent. You can then choose the base color, background color, email body background color and email body text color.
You can see how your choices look at any time by selecting: Click here to preview your email template link.
Step 2a. For more complex customizations
Just a quick note, if you want to do further and more complex customizations to the email templates, it is best to copy the email templates into your theme.
Unfortunately, unlike duplicate page option, you won’t be able to copy in just one click.
It needs to be in cPanel, copy the emails folder from WooCommerce/templates/emails into your themes folder at your theme/WooCommerce/emails.
Be aware that this then overrides any customizations from the email template settings we just went over.
With that out of the way, select Save Changes and we can move on.
Let’s head back to the top of the email settings like I mentioned, these are the individual emails WooCommerce can send.
For the most part, each email has the same fields you can enable or disable each one, set the recipient and subject fields and more. If you are wondering, why are WooCommerce emails not working, this may be the reason too.
From here you can also quickly see the content type as well as the recipient.

The emails that say customer mean these emails are sent to the customer.
Step 3. Customizing the email settings for New Order
Let’s take a peek at New Order email customization. To head into each email settings either select the email title or the gear icon to the right end of each field.
You can start by enabling or disabling the email from being sent with the New Orders.

Let’s assume the majority of store owners want to receive this when they get a new order. So, you can Enable this email notification. Hope you remember that disabling this would make WooCommerce not sending emails.
a. Recipient:
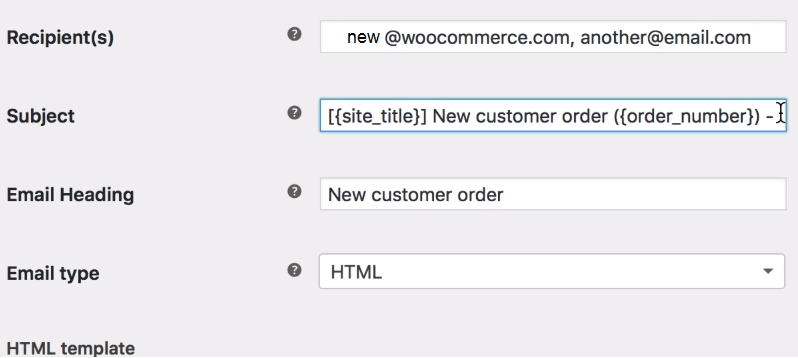
You can then choose the email address or addresses to send this email to, in the recipients field. If you add more than one email address be sure you separate them by commas.
b. Subject
Next up the Subject field is what your recipients see in their inbox. As a default setting, it would show the site title then new customer order with the order number and order date at the end of the subject as shown in the above image.
You can set this to any text and information your heart desires.
c. Email Heading
The Email Heading field works much like the subject but is normally not seen by customers. An Email Header contains more technical information that is not necessarily important for this tutorial.
d. Email type
Our last setting email type lets you choose what format to send your email as. The options being plain text, HTML or multi-part. We will leave it set to the default HTML, so we get our logo styles and colors.
e. HTML template
Finally, you will notice a couple of options under the email type options. You can easily copy over just that email template into your theme to do more complex customizations than the settings offered.
If you have already copied the entire WooCommerce / templates/emails folder into your theme, you would see a Delete Template File button instead of a Copy Template file button.

You can also select, View Template to view the code for that email.
You would be able to edit the template if it was already copied into your theme. I wouldn’t recommend editing the template’s code directly from here though.
If you do edit the template from within WordPress just be certain, you have backups of these templates and select Save Changes, once you have made your customizations.
As I mentioned earlier, the remaining emails have the fields we covered above, Enable or Disable, set the recipient, subject and so on.
Once you have gone through each email settings, you are all set. Feel free to place orders on your store issue refunds and so on to test them out.
Conclusion
Hope this step by step procedure helped you sort out the WooCommerce not sending emails issue.
However, if you still have this WooCommerce emails not sending problem, please feel free to shoot me an email at John@sprout-flowers.com. I will be happy to help you out.
Before leaving, I would like you to have this awesome 10 point checklist guide on improving your site speed in 2 minutes.
This has helped us improve our site speed from 19 seconds to 2.47 seconds. You just have to click the below button to receive it.
Also, if you are on Facebook, Twitter or Pinterest, please feel free to stop by and say hello.
Want new articles before they get published? Subscribe to our Awesome Newsletter.