
WordPress plugins for SEO
WordPress Plugins for SEO: How to Use Yoast SEO Plugin (2019)
Michael K, SEO specialist, Sydney
Date: 7th November, 2018
Let’s take a look at how to fully optimize your WordPress website with the Yoast SEO plugin, one of the WordPress plugins for SEO. So, by the end of this tutorial, your website will be fully optimized and ready to go for all major search engines.
I will also include a lot of free and helpful resources that will actually help you learn SEO and also give you tips and tricks on how you can improve your website’s visibility now on search engine’s eyes.
WordPress plugins for SEO
Let’s just say, you are brand new here and you have no idea what the Yoast plugin does, so in a nutshell, Yoast will actually help index your website for search engines like Google, Yahoo and, Bing. It tells people and search engines what your website or product is all about.
For example, here is our website sprout-flowers.com running on Bluehost and Divi. We provide premium WordPress support maintenance and SEO services for just $49.
You can see it on Google results. So basically, this was all done using the Yoast SEO plugin. It says $69 in the below screenshot because it is a bit old one, currently, we are providing these services for just $49/m as a promo.

I want people to know that our site is providing quality WordPress support, SEO services.
So, we are marketing to a specific audience, so it will help basically index your website and show how you want your visitors to see your website again we used the Yoast SEO plugin for this.
SEO plugin for WordPress or Yoast will improve your ranking on Google
Also, it will actually improve your rankings.
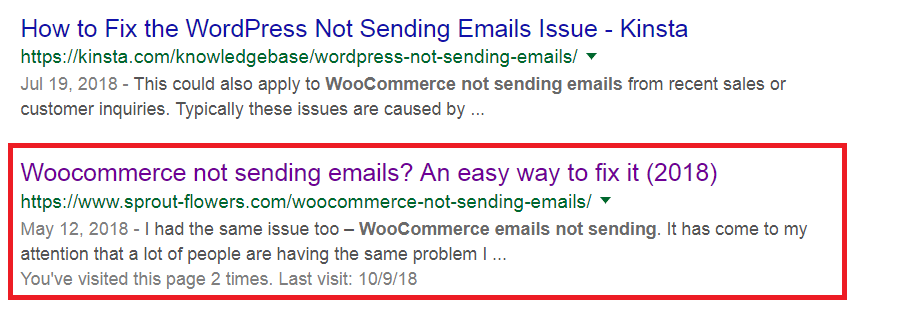
So let’s take a quick look at our website articles, we wrote about how to resolve Woocommerce not sending email issue here. We did on-page SEO on it using Yoast plugin.
Let’s head over to Google and type in Woocommerce not sending emails, our website actually shows up on page one right here now. This was all done with the Yoast SEO plugin.
You can do this with any other SEO plugin for WordPress also. We are not affiliated with Yoast. But Yoast is considered one of the best WordPress plugins for SEO.

So, again it basically tells people what my website is all about.
How to configure Yoast SEO plugin:
We will get the best results only if we configure WordPress plugins for SEO properly. We will look at how to configure Yoast plugin for best results. You can follow me step by step on how to optimize your websites as well.
Step 1: Install Yoast SEO plugin
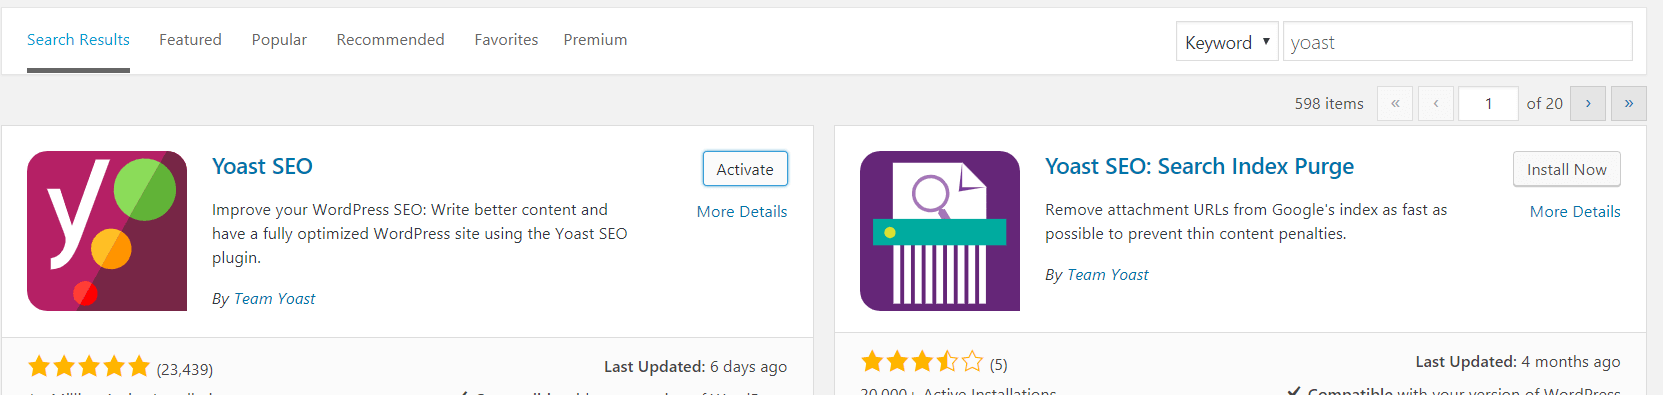
a) Go to Dashboard — > Plugins — > Add New. In the meantime, if you need any help or stuck at somewhere, please click this link: https://sprout-flowers.com/wordpress-support-company/. our team is here to help you.
Once you go to Plugins — > Add New, type in Yoast, it should pop up as the first one, click Install and Activate. It should be simple, I am sure you will probably know.
As a general rule, please always keep an eye on, active installs and positive reviews before installing a plugin for your site security purposes.
Yoast plugin has over 1 million active installs with 20,000 positive reviews as of October 2018 and it is last updated a few days ago which is again a good sign.
If you had an outdated one, please update it asap. It’s always a good practice to keep the WordPress plugins for SEO up to date.
Now, after you activate this plugin, you might actually get a configure-wizard and if you don’t get the wizard I will show you how you can get there. so right here under this Y section, just go to the configuration wizard.

Step 2: Choose either if your site is ready to be indexed or still under construction
Choose option A, if your site is live and ready to be indexed. Choose the option B, if your site is still under construction and you are just not ready yet, then click on Next.
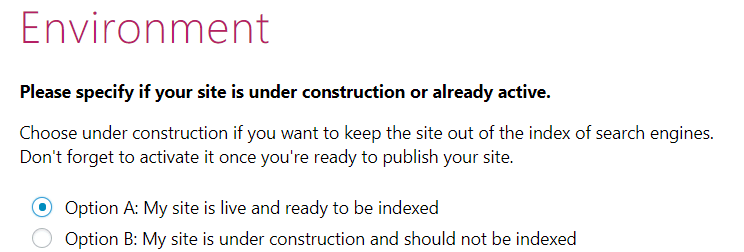
Please remember you can change all of these in the settings later as well so don’t worry too much about it.
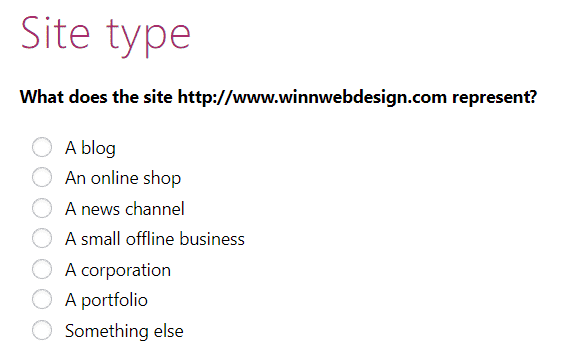
Step 3: What are you building your site for?
I am a small office business/blogger so I would select A blog or if it’s a corporation or an online shop, you can choose accordingly.
Step 4: Type in the name of your site
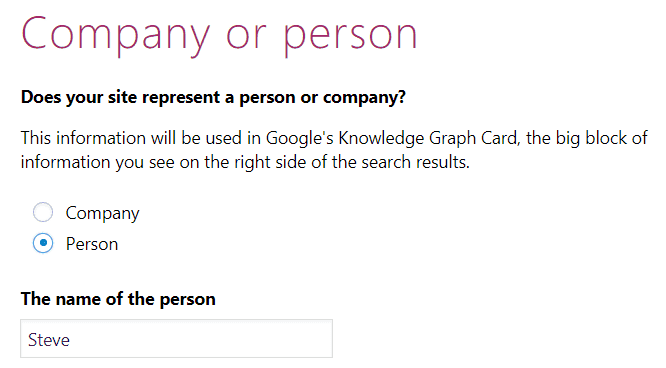
In the next step, you may have to choose if your site represents a person or company. You are going to put your company or your person here.
Since I am a person, I am going to put Steve now, if your site represents a company, you can go ahead and put in the name of your company and put in an image if you have one right here and click on Next.
Step 5: Enter your social media profile information
In the next screen, if you have a social media profile, you can go ahead and enter it right here.
Please make sure it’s not a private profile. I have had people putting in their private profiles, which has become blocked.
If you are a person, you might want to make sure you put your fan page which should be set to Public on Facebook.
You can add your URLs a little bit later too, except that, this is pretty much straightforward. Let’s click on Next and go to the next section.
Step 6: Search engine visibility
Please make sure these are all yes. The worst thing you can do is put no to all of them. Because you want your site, your posts and pages to be indexed, right? I mean that’s where all of your content is. So if you have that to no, it’s pretty much Useless.
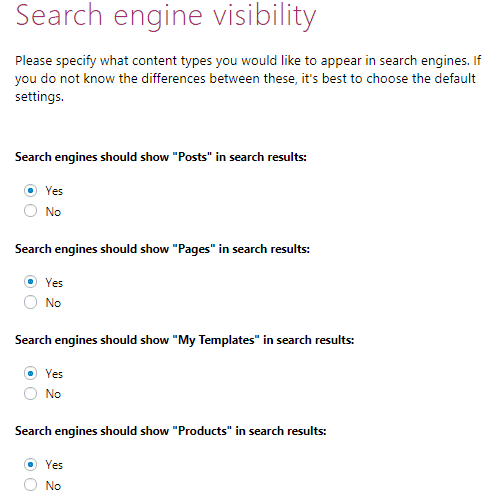
The last two sections My Templates and Products might not appear for you, because, depending on what plugins and themes you have it’s going to give you different options. After you set to Yes, just click on Next.
Step 7: Multiple Authors
Do you have multiple authors? If you do, you’re going to put Yes, if you don’t, just go ahead and put No, I would recommend putting No, because it will actually help prevent duplicate content.
We will talk more about what duplicate content is and why it can be the end of your world, so just go ahead and click on Next for now.
Step 8: Google Search Console
Right here we can authorize this with Google. Now we are not going to do this just yet. We are going to first add a property in a little bit, but we can come to this a little bit later.
I don’t know why they recommend it right now, because it’s something we can do later. Just to let you know, it is important to do this step for any SEO plugin for WordPress to work as designed.
Click on Next for now.
Step 9: Title Settings
Under the Website name, type in the title of your site.
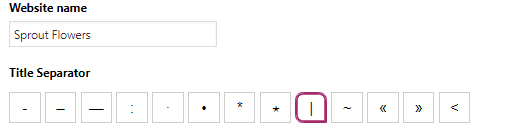
Under Title separator, you can select how you want your title to be separated in search engine results. In the following example, you can see the titles being separated by a vertical line.

They have a quite a few separators so depending on what you like, you can go ahead and add it in right here. Then click on Next.
Step 10: News Letter
Do you want to sign up for the Yoast newsletter? If you do, you can to go ahead and click on sign up, so you can get some newsletters. I get some letters from them.
I think some of their contents are really good, it’s about tips and current trends with SEO, so it’s always good to have it. Once you are done with it, click on Next.
Step 11: Premium part
And this is where they’re trying to sell you their stuff. So, you can check this out if you want the premium version. All the Wordpress plugins for SEO have their own premium versions. I personally use their free version.
With that being said, it is always good to check out their premium features as well. We are done with the Configuration Wizard part, you can go ahead and click on Close.
Part 1: Configuring General Tab on Yoast
Click on Yoast — > General. You will see three tabs. 1. Dashboard 2. Features 3. Webmaster Tools.
A) Dashboard
This is just to show you if you have any issues SEO wise on your site.
B) Features
We will take a look at the various options in Features in the General section, first of all, make sure all the eight options are set to On in Feature as shown in the example here.
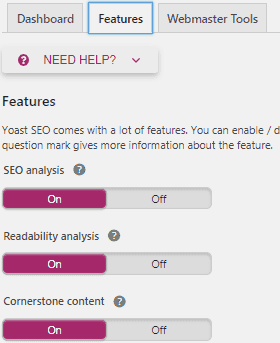
This is basically what Yoast does like. So, for example, a cornerstone contents are your most important article like what does your site represent.
It has to be included in XML sitemaps which we’re going to submit those to Google in just a little bit, but you want to make sure that is On.
This is basically the directory of how robots crawl your website. So you want to make sure all these here are On. I think I emphasized enough about this. Please head over to Save Changes.
C) Webmaster tools
This is where we do Google and Bing verification. Let’s go ahead now and do that.
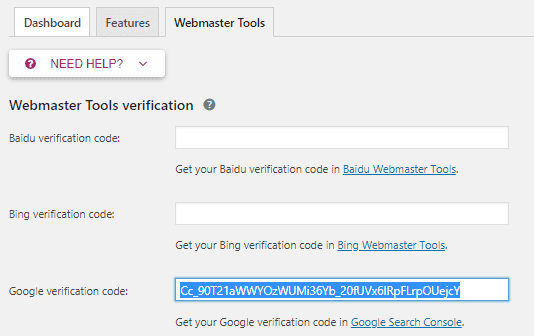
I am going to go ahead and verify my website with Google webmaster tools.
1) Go to https://www.google.com/webmasters/ and sign in using your Google account. Under Add a Property, type in your website address with https://www.
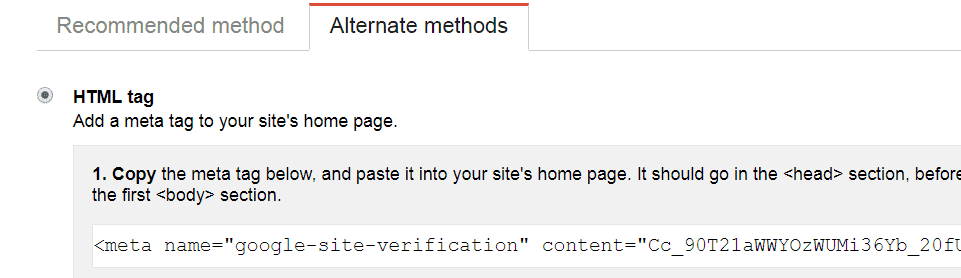
2) When prompted, click on the Verify button and select HTML tag as a verification method. Copy only the code and paste it next to the Google verification code box as shown in the above box.
Please make sure you cleaned up the other texts <meta name=”google-site-verification” content=” and keep only the code here as shown in this example.
Please go to https://www.bing.com/toolbox/webmaster and verify with Bing webmaster tools too. The procedure is the same.
You may think why do I need to verify with Bing and it’s dead. As a matter of fact, Bing really controls 15 percent of the internet still. Most of those people who are over 60 years old are still an audience of Bing.
Obviously, so once you have done that make sure you click on Save Changes.
Part 2: Configuring Search Appearance on Yoast
Our website is now connected to Bing, and also Google. Let’s go ahead now and go to Search Appearance which would be right below the General section that we discussed in part 1 here.
There will be seven tabs here under Search Appearance.
A) General
You can skip General as we already configured this part in Configuration Wizard.
B) Content Types
This section is very important. In fact, this is probably one of the most important parts in any WordPress plugins for SEO. Under Content Types, you will find several sections.
i) Let’s take a look at the first one: Posts

Please follow these settings:
Show Posts in search results? Set it to Yes.
Date in Snippet Review: Set it to Show so people know what date you published your post or article on. You can hide it if you want. But I recommend showing it.
Yoast SEO Meta Box: Set it to Show.
ii) SEO Title
In a nutshell, using this section you can set how do you want your posts to be displayed. You know there’s a lot of different ways you can do it. The way that I personally do it and most SEO experts do is Title, Separator and Site Title.

iv) Meta Description
Under this section, I like to use an excerpt. Some people don’t like to use it, an excerpt is nothing but a brief synopsis about your content.
You can play with various options here. Again, if you’re not an SEO expert, don’t use any of these. Because Excerpt is the default, so you can leave it blank. In other words, if you leave it blank, it’s just basically going to grab whatever content is up on the page.
This is actually Yoast recommended as well, Title, Separator and Site Title on SEO title and Excerpts on Meta Description.
You may want to set the same settings for Pages and Products.
v) My Templates
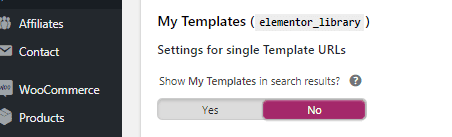
This is like elements for the library, etc. Right here, I am going to put No. I don’t want my templates or my elementary templates to be indexed by search engines.
I will click on Save Changes.
C) Media
For media make sure, Redirect attachment URLs to the attachment itself is set to yes.
The reason why is because, by default, when you upload images to WordPress, and when someone clicks on the image, it will actually redirect them to the actual page or post instead of setting them to a random page with just an image. So make sure this is set to Yes.
D) Taxonomies
This is basically where we’re going to set whether we want to index categories and tags and everything on the search engine. Now, personally, I don’t recommend tags to be indexed. I don’t think tags should be in a search engine results.
i) Categories
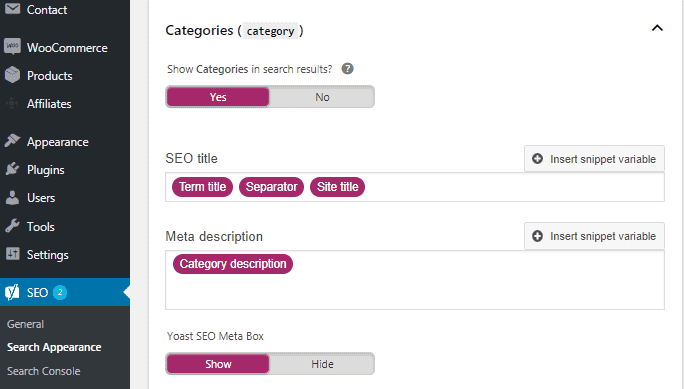
But you do want the categories to be indexed. For categories, so the most optimal way that I personally believe is having the Term Title and then Separator and then the Site Title just like we did for Posts in under Content Types in the previous post.
For Meta Description, copy and paste this text: %%category_description%%
ii) Tags
So right here we have tags. Please set Show Tags in Search Results option to No. I don’t recommend tags at all, because tags can cause duplicate content issues.
There are some cases where tags, depending on what you’re doing, can cause duplicate content and duplicate content can throw you on page nine thousand. So, you don’t want to piss off Google because it takes a long time to recover and it’s just not worth it.
iii) Formats
I believe the same thing for Formats. I am going to go ahead and set it to Disabled.
iv) Product Categories
Set it to Yes and follow the same settings as Categories above.
v) Product tags
Set it to No.
vi) Category URLs
Please leave it as default – Keep option.
I am going to explain what this is, but I am not going to recommend to change it. You want to leave it as keep.
When you go to a website and click on Products, you will see an URL prefix for that particular product, this is what this Keep option does.
If you change it to Remove, you won’t be able to change it back. In other words, if you remove it they’re gone forever. If you change it back to Keep, you’re going to get 404 errors. You want to just play it safe. So, leave it as Keep.
E) Archives
Let’s go ahead and go to archives. I recommend disabling all archives. Archives is a very debated subject, but archives can cause duplicate content, so I recommend disabling that as well.
And for our author archives and date archives, I recommend just to disable those, because these can also cause duplicate content too.
Anything that can cause duplicate content on your website is going to hurt you and it’s just not worth it.
Leave the Date archives settings and Special pages as default.
F) Breadcrumbs
I don’t recommend Breadcrumbs because it again can break your theme depending on what you’re using.
But if you want to go ahead and enable Breadcrumbs, you can click on Enable. And again all they really are just these little dashes on the search engine results. Some people believe it’s good and it can help, but it’s just not worth it.
I don’t recommend breadcrumbs so I am going to click on Save Changes.
G) RSS
This is good by default. However, if you want to go ahead and change it, you can add the commands suggested in there. But as I mentioned, it’s good enough as it is, so click on Save Changes.
Now that, we are done with General and Search Appearance options. Next one is Search Console.
Part 3: Search Console
You might get a little reauthorize it button with Google here and you basically click on it and you copy the shortcode or you copy the text, and you put it back in the box here.
This is only if you didn’t already authorize it, because we basically already created it and we added the sitemap for it.
So if there’s that little box right here telling you to authorize it, please go ahead and authorize it and then select the domain.
Once you’re done with that, any errors that you get or if there is something wrong with your website, it will tell you right here, so you can properly authorize them.
And if you’re not sure on what to do, you can always go to Settings under Search console and redo it all over again.
Now your website is on with Google. It’s up and running, it’s being crawled, it’s being indexed.
Part 4: Social profiles
Now again you need to take your Facebook URL and other social media URLs and make sure it’s not private and click on Save Changes,
Part 5: Tools
In Tools, we have Import and Export, File editor and Bulk editor settings.
A) Import and Export
You might not ever use like import and exports settings, so you might want to just leave it blank.
The section of import/export is basically to export or import the settings of SEO plugins. So, basically, once you have your settings for Yoast already, you can actually export it and load that onto your other websites.
B) File editor
File Editor is in charge of a robot text file and I would click on Create robot.txt file here.
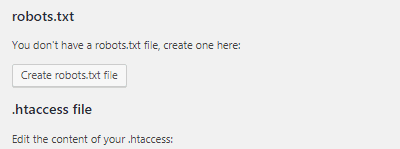
Once you click on it, you will see a robot text file which means it is created successfully. Now, if you don’t know what a robot text file is, please just don’t change anything and click the Back button on your browser.
What is the robots.txt?
I am sure you’re wondering what do I do with this? What is the robots.txt file and what is the best format for it? The robots.txt that comes with WordPress is probably the one that you should be using unless you really know what you’re doing.
Robots.txt is a bit like playing with a butcher’s knife. If you do things wrong, it turns out very messy. So, if you don’t know what you’re doing with it, please don’t touch it and leave it to the WordPress default.
Please click on Save Changes.
With that setting, we are done with Tools.
How to get XML Sitemaps
You need to submit sitemaps to Google for them to be crawled and indexed. Let’s go ahead and add in our sitemap now.
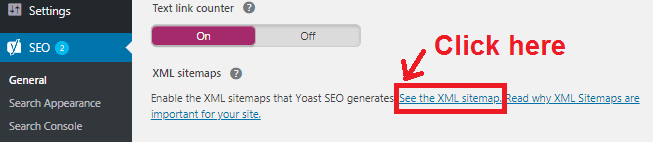
Go to General — > Features tab — > XML Sitemaps and click on See the XML Sitemap link as shown here.
Once you click that, you will see a list of sitemaps of your website like this.
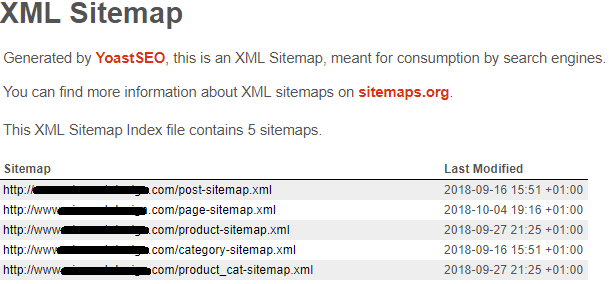
This is your sitemap. And this is what you need to submit to Google and to Bing as well.
How to submit Sitemaps to Google webmaster tools
1) Go to https://www.google.com/webmasters/ and sign in with Google webmaster account that we used to verify our website above.
2) Chances you would be on the new webmaster tools, I am personally comfortable with the old version. So, at the left bottom corner, you will see a button called Go to the Old Version. Click on it, you will be redirected to the old webmaster tools.
3) Go to Dashboard — > Crawl — > Sitemaps. Click on Add/Test Sitemap button at the top right corner and enter the sitemap name you had from Yoast plugin in the above one by one here as shown in the screenshot.
Before clicking the submit button, you can test to see if the sitemap is working by clicking the Test button. Repeat this procedure for all the five sitemap.xml files.

With that, we configured the Yoast WordPress SEO plugin successfully. Now, I will quickly show how to optimize the blog post article to rank on Google.
How to do SEO (Yoast SEO)
Before we jump in, let me throw in a few steps we follow in Sprout-Flowers to rank our articles on Google.
1) The number of words in an article or blog post should be more than 2000 words. Studies show that most of the articles ranked on the Google first page are of more than 2000 words.
2) The main keyword that you want to rank for, should be present in the title, meta description part, first paragraph, one of the subheadings and last paragraph. This would be ideal.
Please do not try to stuff your keywords throughout the article. Google doesn’t love keyword stuffing so much. Only sprinkle the keywords naturally in the above places.
3) Try to have an appropriate image at least once in every 150 words.
4) Once published, resubmit the Sitemaps that we discussed in the previous section.
5) Submit your blog post URLs on all the major search engines using these sites: https://www.entireweb.com/free_submission/ and http://www.freewebsubmission.com/.
6) Get the social signals and do the social bookmarking.
7) Build natural backlinks through outreaching.
How to Optimize a Blog post to rank on Google using Yoast
Let’s get back to the topic, when you click any blog post, you would see a Yoast Snippet Preview section like this:
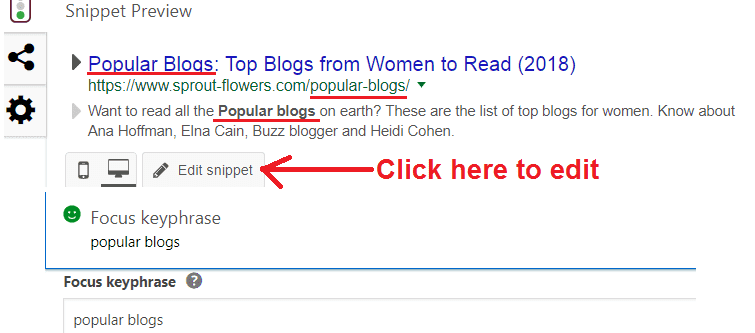
You may be wondering what exactly is Snippet Preview. This is just the preview of how Google will show the result of your blog post when some searched for a related keyword.
In this example, the Focus Keyword is Popular blogs. In other words, this is the main keyword I want to rank for. You can notice I placed the main keyword at the beginning of the SEO title.
It’s important to place the keyword at the beginning of the title for SEO purposes. I also coined my blog post URL based on the focus keyword. Also, I inserted the keyword in the meta description.
At any point in time, you can edit this Snippet by clicking the Edit Snippet button as shown in the image above.
I hope this tutorial helped you a bit. Yoast is considered one of the best WordPress plugins for SEO.
If you have any questions, please feel free to comment below, I would be happy to answer.
Also, you can join our official WordPress support Facebook group at https://www.facebook.com/groups/wordpresshelpandsupportgroup while you are there, please hit like on our page at https://www.facebook.com/WPSproutflowers/.
Want to have peace of mind?
Hire a Virtual Assistant to
maintain your website and
run your business